When your garage needs a little “housekeeping,” installing a door means fitting a precisely sized system that moves safely every time you press the button. You’ll assess materials and insulation, measure the opening, plan hardware locations, and choose springs and tracks that match door weight. Then you’ll mount components, align the door, set tension, and verify sensors and controls. Done correctly, it’s smooth and secure—miss a step, and you risk hazards, costs, and callbacks. Here’s what to check first.
To understand how the system operates, it helps to know the role of essential garage door installation components and how they function together.
Key Takeaways
- Garage door installation is the process of selecting, measuring, and fitting a door system to a garage opening.
- It begins with precise measurements of width, height, headroom, side room, and backroom to ensure proper track clearance.
- Materials, panel styles, insulation, finishes, and glazing are chosen to match durability, climate, appearance, and safety needs.
- Hardware is assembled and aligned, springs are tensioned to specifications, and the opener is configured for weight, travel, and safety.
- Sensors are aligned, auto-reverse is tested, and final checks verify smooth operation, compliance, and user safety.
Materials, Styles, and Insulation Options
Before you order a door, define your performance needs, climate exposure, and budget so you can select the right material, style, and insulation.
Evaluate material types: steel for durability and low upkeep, aluminum for corrosion resistance, wood for classic appearance with higher maintenance, fiberglass/composite for dent resistance, and vinyl for impact resilience.
Evaluate materials: steel durability, aluminum corrosion resistance, wood classic look, fiberglass dent resistance, vinyl impact resilience.
Match panel style—traditional raised, carriage-house, or contemporary flush—to structural stiffness requirements and wind-load ratings.
Specify insulation benefits based on climate and noise targets. Choose polystyrene panels for basic thermal improvement and quieter operation; select polyurethane foamed-in-place cores for higher R-values, increased rigidity, and better air sealing.
Verify fire-safety and emissions certifications. Confirm compatibility with your opener’s torque and spring cycle ratings.
Select finishes and glazing with tempered or laminated glass for safety and UV control.
Choosing the right garage door installation materials plays a major role in durability, insulation, and long-term performance.
Measuring Your Opening and Planning the Layout
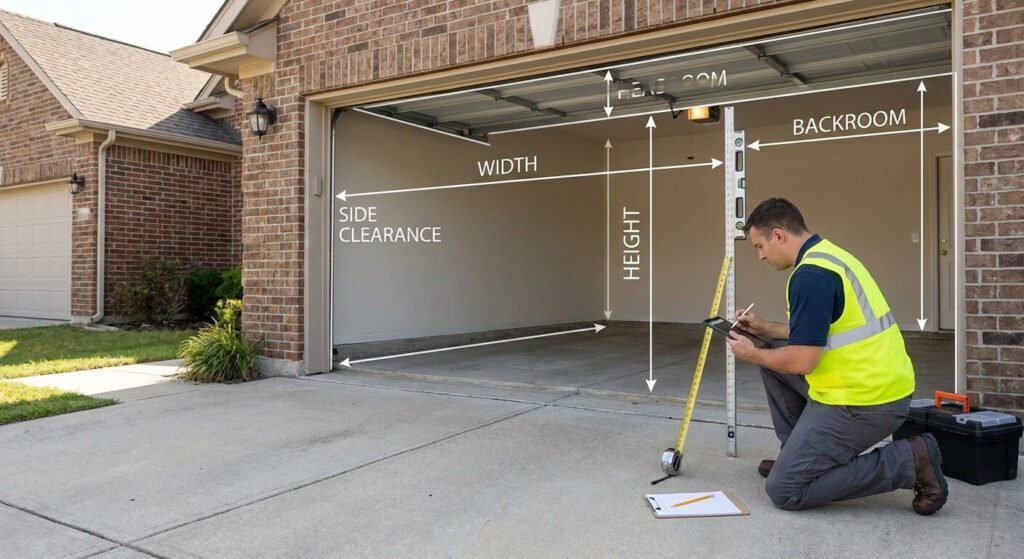
Start by identifying the rough opening: confirm the framed width, height, and plumb, level, and square conditions against manufacturer specs.
Measure the finished width and height at multiple points, and record headroom, side room, and backroom to the nearest 1/8 inch.
Plan track clearance by verifying unobstructed headroom for the chosen spring system, sufficient side room for tracks and hardware, and adequate backroom for full door travel and opener.
Identify Rough Opening
Two critical checks anchor this step: confirm the rough opening size and map the layout to the door’s specifications. You’re verifying the framed rectangle the door will fill, not the finished trim.
Establish rough dimensions with a calibrated tape and level, then compare them to the manufacturer’s framing chart. Prioritize opening precision at the header, jamb faces, and floor line so tracks, seal, and torsion hardware align safely. Confirm plumb, level, and square; note any shims or structural repairs before you proceed.
- Fresh pencil marks on clean lumber, showing plumb jambs and a true header line
- A bright level bubble centered against the jamb, proving square corners
- Chalk lines snapped across the slab, defining the final track and seal path
Account for required headroom and side room clearances around the opening.
Measure Width and Height
One precise set of measurements drives a safe, smooth install: record the opening’s clear width and height at multiple points and plan to the tightest dimension. Use a rigid tape, laser, and notepad.
For the width measurement, mark the jambs plumb, then measure left-to-right at header, mid-span, and threshold. For the height measurement, measure floor-to-lintel at left, center, and right. Note any out-of-square variance greater than 1/4 inch.
Confirm the floor is level across the threshold; document high and low spots. Check jamb faces for bowing with a straightedge. Record the header’s lowest point.
Deduct the tightest dimension for door size selection only if the manufacturer specifies clearance; otherwise, match nominal size to the smallest opening. Photograph readings. Label each measurement location. This prevents binding and ensures correct panel fit.
Plan Track Clearance
With your opening’s tightest width and height documented, verify there’s enough room for tracks, torsion or extension hardware, and headroom. Confirm clearance requirements: typically 12 inches of headroom for torsion systems, 10 inches minimum for low-headroom kits, and at least 3.5 inches on each side for vertical tracks.
Check ceiling obstructions, conduit, and lighting that might interfere with track alignment or spring shafts.
- Tape stretched across the header, pencil marks at centerline, level resting on the jamb.
- Overhead joists measured, a laser line casting the path of horizontal tracks.
- A torsion tube mocked in place, ensuring cables clear the flag brackets.
Lay out the door centerline on the header and floor. Establish plumb jambs. Snap lines for horizontal tracks. Maintain parallelism to ceiling, proper slope, and unobstructed travel paths.
Once you understand how installation works, the next step is to find the best garage door for your house based on design and functionality.
Hardware Components: Tracks, Springs, Rollers, and Opener
Hardware sets the foundation for a reliable, safe garage door system, and you’ll verify each component before installation. Inspect vertical and horizontal tracks for straightness, gauge, and flanges; confirm track alignment with plumb and level, and ensure fastener holes match your wall framing and header height.
Choose torsion or extension springs by door weight and cycle rating; document spring tension requirements and verify shaft, drums, and safety cables or containment devices.
Select nylon or steel rollers with sealed bearings sized to the track radius; check stems and hinges for load rating and corrosion resistance.
For the opener, confirm horsepower, drive type, and integrated safety features: photo eyes, force reversal, and soft start/stop. Validate compatibility with door weight, travel limits, and manual release accessibility.
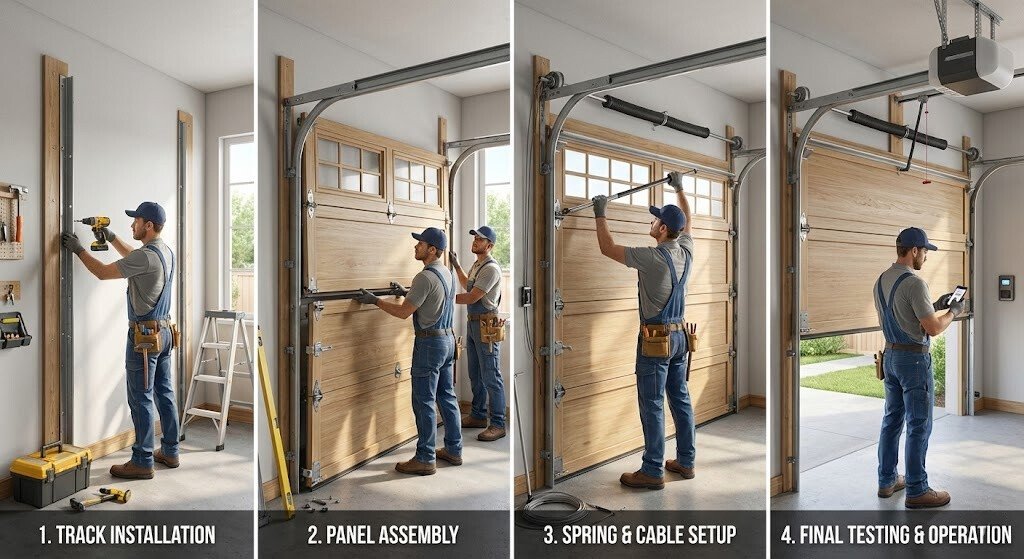
Step-by-Step Installation Process
Prepare the opening: clear the area, cut power to the opener, and wear eye and hand protection.
Confirm header framing is plumb and level. Check tools: wrenches, sockets, torque wrench, winding bars, level, impact driver, shims, fasteners.
Lay out door sections, hinges, and rollers.
Set the bottom section on shims, center it, and fasten hinges. Insert rollers and assemble vertical tracks; plumb and anchor.
Stack remaining sections, hinge them, and secure rollers. Install horizontal tracks with correct back-hang and slope.
Mount torsion tube, drums, and cables. Wind springs to spec, lock set screws, apply safety marks, tension and align cables, and check bearing plates.
Ensure panels are edge-to-edge, tracks true, rollers glide, springs marked, cables taut, and door balanced.Finish with a balance test, fastener check, lubrication, and installation notes.
The installation process isn’t always the same, and learning about different types of garage door installation explains why methods can vary.
Smart Features, Safety Sensors, and Controls
Although the door now operates mechanically, you still need to commission its smart features, safety sensors, and controls to meet code and ensure safe use.
Start by aligning the photoelectric sensors: mount them 4–6 inches above the floor, aim lenses directly, and verify solid indicator LEDs. Test reversal by obstructing the beam; the door mustn’t close. Calibrate force and travel limits so the door stops on contact and fully seals without overdriving.
Align sensors 4–6 inches high, verify LEDs, test beam reversal, and calibrate force and travel limits.
Next, pair the opener with smart technology: connect to Wi‑Fi, update firmware, and enable encrypted logins and two‑factor authentication.
Add geofencing and activity alerts judiciously. Program remotes and keypads with rolling codes, then set lockout and vacation modes.
Perform monthly tests: sensor blockage, auto‑reverse on a 2×4 block, and manual release function.
Costs, Timelines, and Choosing DIY vs. Professional Installation
Before you pick up tools or hire a crew, scope the total cost, schedule, and risk profile. Installation costs typically span door, track, springs, opener, disposal, permits, and labor. Get itemized quotes, confirm warranties, and pin down lead times for door sourcing. A standard replacement runs 4–8 hours; complex framing, high-lift tracks, or custom materials extend timelines.
DIY advantages include savings and flexible scheduling, but only if you own torque-rated tools, can tension springs safely, and follow manufacturer specs. If not, hire a pro to avoid injury, misalignment, or voided warranties. Verify UL-listed components and code-compliant sensors.
- Measure twice: rough opening, headroom, backroom, and side room
- Visualize cable routing and spring winding direction
- Picture safety stops, photo-eyes, and test cycles
Conclusion
You now understand garage door installation—from measuring and layout to tracks, springs, opener, and safety sensors. If you’re worried it’s too technical, remember you can handle basic prep while a pro handles tensioned springs and final calibration. That keeps you safe, ensures smooth travel, and preserves warranties. Verify force settings, sensor alignment, and fastener torque, then test auto-reverse. Whether you DIY partially or hire fully, you’ll get reliable operation, smart controls, and a secure, well-balanced door.