If you’re planning to install a garage door, start by choosing the type and verifying the opening is square, plumb, and level. Gather rated fasteners, a torque-rated drill, and safety gear. Confirm headroom, side room, and backroom. Lock out power to any opener and brace the door area. You’ll mark reference lines, set tracks or hinges, align panels or frames, torque hardware to spec, and test balance—then you’ll tackle the crucial steps that prevent failures.
Key Takeaways
- Verify openings are plumb, level, and square; confirm headroom/side room for the chosen door and track system.
- For sectional doors, start with the bottom panel, set vertical tracks equally, anchor to framing, and test balance mid-travel.
- For roll-up doors, assemble the curtain on the barrel, mount level end brackets, and test smooth manual travel before adding weatherseals.
- For side-hinged doors, install a leveled frame, hang leaves on heavy-duty hinges, and ensure even reveals and swing clearance.
- For tilt-up doors, use a rigid slab, correctly matched springs, precise pivot placement, and fully cycle to tighten and lubricate.
Sectional Garage Door Installation
Clear the opening, confirm the framed rough opening is plumb, level, and square, and lay out parts per the manufacturer’s checklist.
Wear eye protection and gloves. Verify panel width and track clearance.
Start with the bottom panel; shim to level and fasten hinges loosely. Stack remaining panels, adding hinges and rollers.
Assemble vertical tracks with equal setback; anchor to framing. Install horizontal tracks, verify pitch, and tighten hardware.
Mount the torsion shaft, drums, and cables. Wind springs per specified turns using winding bars only. Test balance: the door should hold mid-travel.
Lubricate rollers and hinges. Select appropriate sectional door materials.
If you’re still deciding between styles, explore the best garage door options for your home before you choose an installation approach.
Roll-Up Garage Door Installation
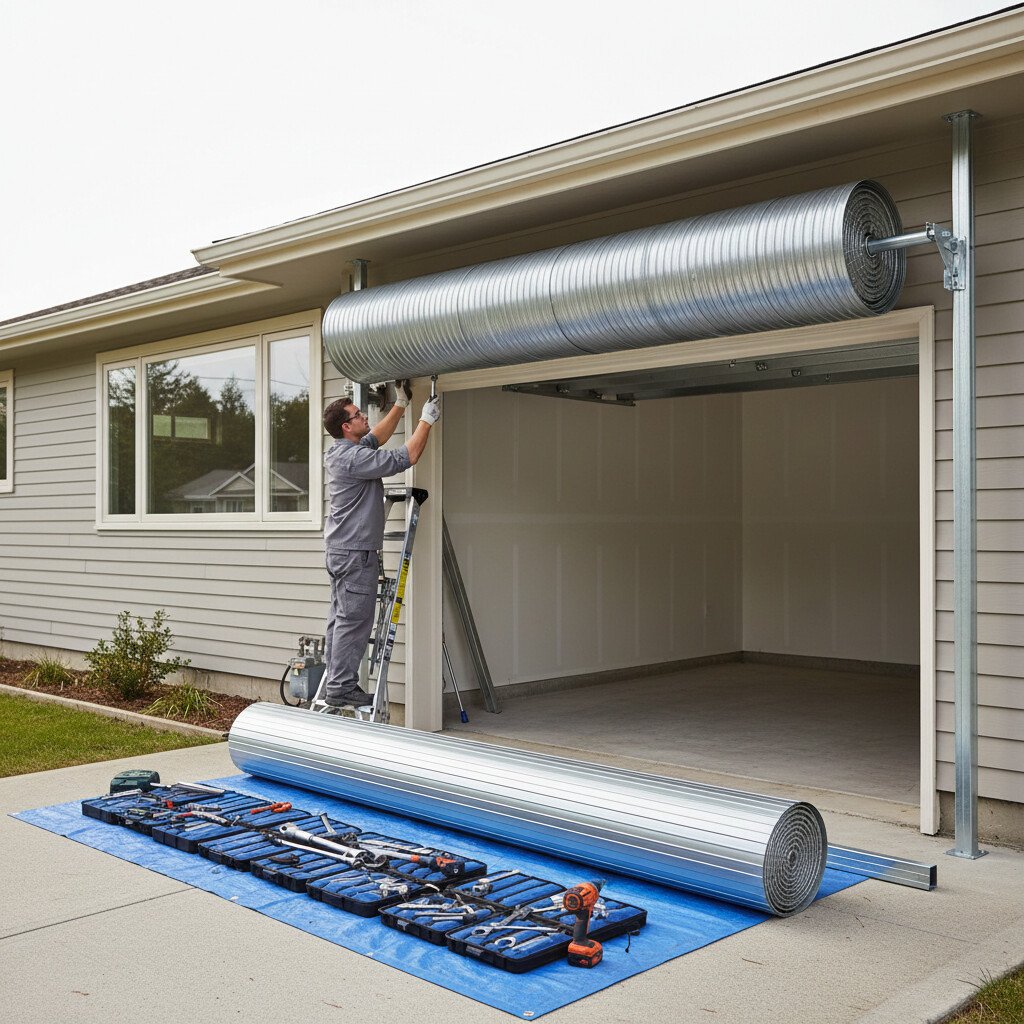
Roll-up doors may look simple, but installation requires careful prep and safety. Measure the opening, check plumb jambs, and confirm headroom. Disconnect power, lock out the opener, and wear gloves and eye protection.
Assemble the curtain on the barrel per manufacturer specs. Anchor guide tracks to solid framing, ensuring proper alignment and clearances. Hoist the barrel, mount end brackets and bearing plates, level the shaft, secure fasteners, and install the curtain into guides.
Tension springs or counterbalances according to the chart using winding bars—never improvised tools. Test manual operation for smooth travel and correct stops.
Install hood and weatherseals, connect the operator and limit switches, document mechanisms, and schedule maintenance.
Since sizing needs can vary by design, follow garage door installation measurements to avoid fitment issues with different door types.
Side-Hinged Garage Door Installation
Install side-hinged doors with precision and safety. Measure the opening, check plumb, level, and square. Select materials suited to weather and security, and confirm hinge and frame load ratings.
Remove obstructions, mark hinge locations, and pre-drill pilot holes. Install the frame, shim to level, and anchor with corrosion-resistant fasteners. Hang each leaf on heavy-duty hinges, starting at the top, ensuring even reveal and proper swing clearance.
Install threshold, weatherstripping, surface bolts, and keyed latch. Adjust hinges and strikes for smooth closure. Test operation, auto-closers, and stops. Finish with paint or sealant.
Schedule maintenance: lubricate hinges, tighten fasteners, check seals, and inspect alignment.
Tilt-Up Garage Door Installation
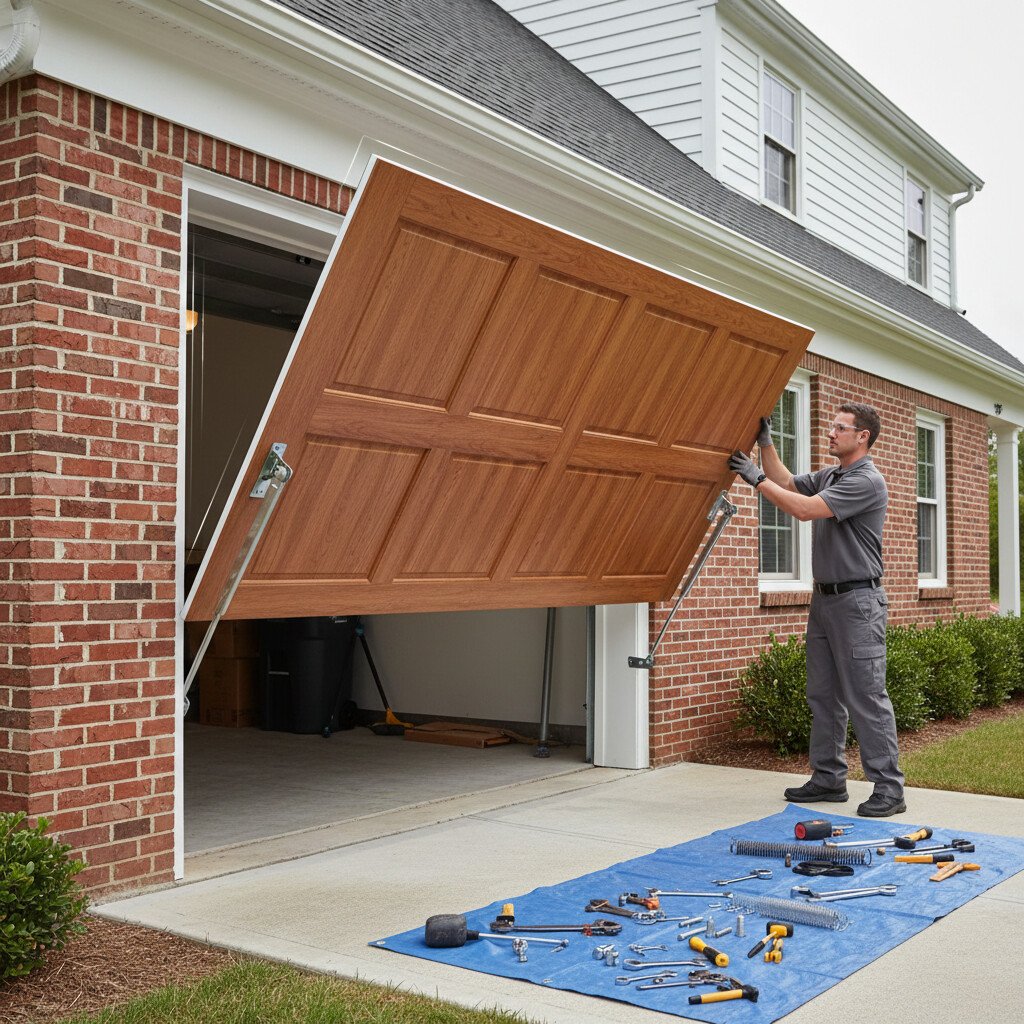
Tilt-up doors require precise prep as the panel pivots as a single unit. Measure the opening, check plumb jambs, and verify header load. Select a straight, rigid door, rated pivot hardware, matched springs, and corrosion-resistant fasteners. Lay out hinge points per manufacturer instructions.
Follow safety precautions: lock out power, wear eye and hand protection, and use two helpers. Anchor jamb brackets, mount side pivots, and hang the door, shimming for 1/8–1/4 inch reveals. Attach springs, pre-tension slowly, and test balance. Install stops, safety cables, and handles. Cycle the door, tighten hardware, and lubricate moving parts.
| Step | Tool | Checkpoint |
|---|---|---|
| Layout | Level | Jambs plumb |
| Mount | Wrench | Equal reveals |
| Balance | Scale | Mid-hold test |
Some door types pair better with specific systems, so choosing the right garage door opener can make installation smoother and more reliable.
Smart-Enabled Garage Door Systems Installation
Before adding smart controls, verify the existing door and opener are safe and compliant: the door must move smoothly, springs balanced, tracks aligned, and photo eyes present and functional.
Disconnect power. Mount the smart hub or controller per the manufacturer’s diagram, away from moving parts. Wire low-voltage terminals to the opener’s control screws, matching polarity if required.
Restore power, pair the device to Wi‑Fi (2.4 GHz typically), then calibrate open/close limits in the app. Test the wall button and remote first, then the app, ensuring obstruction reversal works.
Enable notifications and geofencing cautiously. Update firmware and set unique, strong credentials.
- Essential installation tips for reliable smart technology
- Wi‑Fi placement, interference checks, and secure networks
- Battery backup and manual release procedures
- Periodic sensor alignment and force tests
Conclusion
You’ve navigated the nuts and bolts with care, keeping everything square, true, and well-behaved. Now, do a gentle once-over: verify fasteners are snug, tracks aligned, springs balanced, and safety sensors polite. Confirm headroom clearances, hinge positions, and lift points aren’t feeling overworked. Power up, calibrate limits, and test auto-reverse. Tidy wiring, label circuits, and secure covers. When the system whispers instead of groans, you’ve done it right—safe, efficient, and ready for everyday comings and goings without any unpleasant surprises.