By coincidence, the safest garage door installs all start the same way: you plan, gear up, and verify every component before a single bolt turns. You’ll clear the work zone, wear ANSI-rated eye protection, cut-resistant gloves, and steel-toe footwear, then lock out power before handling springs. You’ll stage panels for two-person lifts and confirm track plumb and hardware torque specs. Do that, and you’ll avoid the common failures—yet one step still trips up careful installers…
Key Takeaways
- Prepare the workspace: clear a 10×20 ft area, ensure good lighting, and confirm the opening is plumb, level, and square.
- Wear proper PPE: safety glasses, cut-resistant gloves, steel-toe footwear, and hearing protection; inspect and replace damaged gear.
- Handle sections safely: verify weights and hinge orientation, use two-person lifts, and place panels flat on padded supports.
- Install tracks, opener, and springs per manufacturer specs; de-energize, lockout/tagout, and use correct tools and torque for tensioning.
- Test thoroughly: set travel/force limits, verify photo-eyes at 4–6 inches, ensure 2×4 reversal, and recheck all fasteners and cables.
Prepare the Workspace and Assess Door Components
Before you unbox a single part, clear a 10-by-20-foot work area, remove tripping hazards, and set bright, stable lighting.
Mark a safe perimeter, secure cords, and verify floor integrity. Good workspace organization prevents snag points and complies with manufacturer procedures and local codes.
Confirm the opening is plumb, level, and square; document measurements at header, jambs, and slab.
Check clearance for tracks, spring shaft, and opener per specifications. Stage hardware in labelled bins and separate fasteners by size and grade.
Begin a door component inspection: examine panels for warping, dents, or delamination; verify hinges, rollers, and bearings rotate freely; reject cracked drums, bent tracks, or frayed lift cables.
Validate fastener lengths, anchor types, and torque requirements against the installation manual before proceeding.
If you want the full overview first, here’s what garage door installation is and how the entire system works from start to finish.
Choose and Wear Proper Personal Protective Equipment
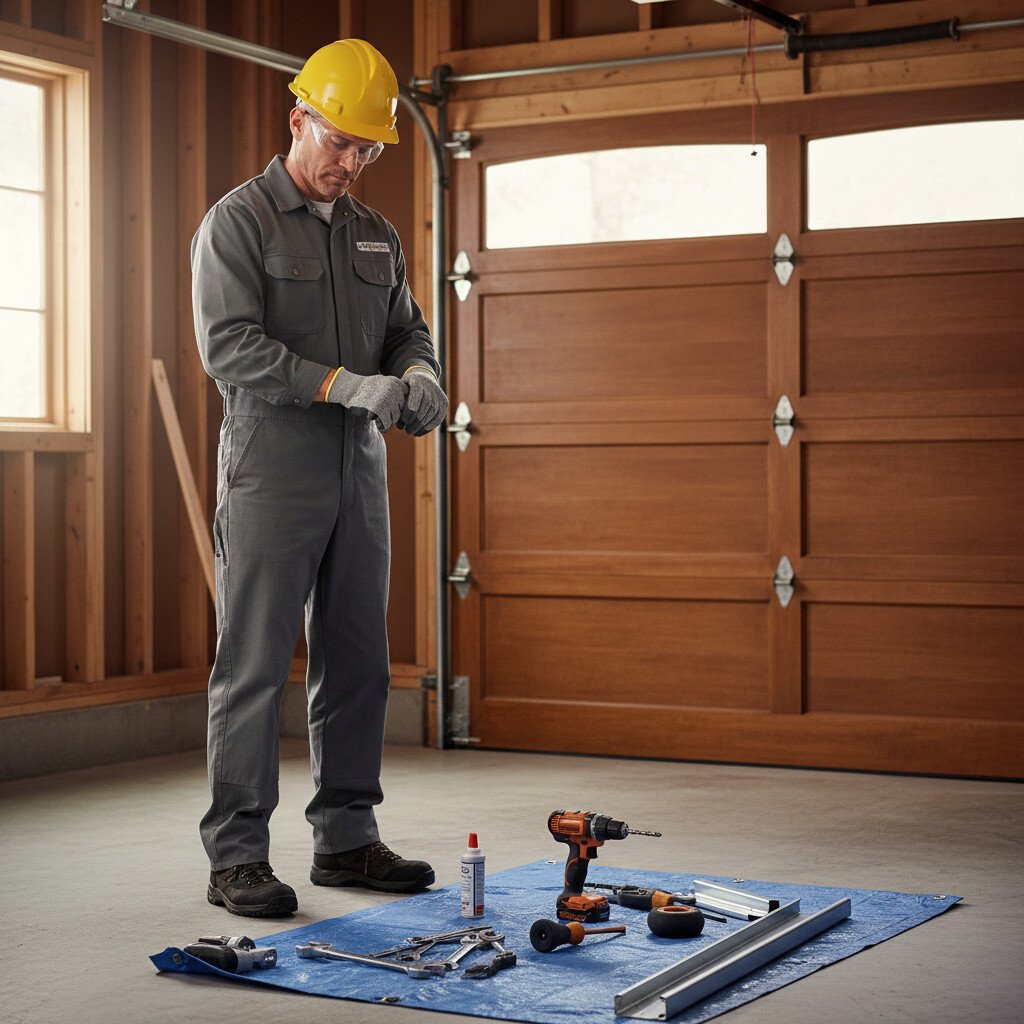
Before you handle panels, springs, or tracks, put on safety glasses and cut‑resistant gloves that meet ANSI/ISEA standards.
Wear steel‑toe, non‑slip footwear compliant with ASTM F2413 to protect against dropped loads and slick surfaces.
Use hearing protection rated for your tool dB levels and a hard hat that meets ANSI Z89.1 when overhead work or torsion components are present.
Safety Glasses and Gloves
A garage door install exposes you to flying debris, sharp edges, and pinch points, so put on safety glasses and cut‑resistant gloves before handling any components.
Choose ANSI Z87.1-rated safety glasses with side shields to block chips from tracks, torsion springs, and fasteners. Ensure lenses are clear, unscratched, and clean for accurate alignment tasks. Fit frames snugly; adjust temples so glasses don’t shift when you bend or drill.
Wear snug, ANSI/ISEA 105-rated cut‑resistant protective gloves. Select a dexterous knit with nitrile or polyurethane palms for grip on metal panels and cables without excess bulk.
Inspect gloves for tears, oil, or frayed seams before use. Keep hands away from moving assemblies; use tools, not fingers, to guide cables. Remove jewelry, and secure loose sleeves to prevent snag hazards.
Steel-Toe, Non-Slip Footwear
Footing matters: wear ASTM F2413-certified steel-toe boots with puncture-resistant midsoles and oil‑ and slip‑resistant outsoles. You’ll handle heavy panels, tracks, and tools; protect toes from crush hazards and sharp debris.
Steel toe benefits include impact resistance to rated joules and compression protection to rated kN, reducing foot injuries during lifts and drops. Choose EH-rated footwear if you’ll use powered tools, and confirm ladder-compatible heels.
Select non slip materials that maintain traction on concrete with dust, oil, or water. Look for high-COF rubber compounds, channel tread patterns, and defined heels for rung grip.
Replace worn soles immediately. Lace boots fully, tuck laces, and keep tread clean. Verify fit with arch support to prevent fatigue. Inspect daily; remove compromised pairs from service.
Hearing and Head Protection
Even in a home garage, impact and noise hazards demand head and hearing PPE that meets recognized standards. Select ANSI Z89.1-rated hard hats or bump caps per task; choose headgear options with suspension adjusted snugly and chin straps when working on ladders.
Avoid cracked shells and expired components. For drilling, impact driving, and spring winding, wear ear protection that achieves at least NRR 25; combine earplugs and earmuffs for high-decibel grinders. Ensure a tight seal around eyewear stems and keep cushions clean and dry.
Inspect PPE before each shift. Replace worn straps, liners, and seals. Don PPE before powering tools or tensioning torsion hardware. Maintain clear overhead clearance to prevent strikes.
Store equipment away from solvents and heat. Document selections to match OSHA/ANSI requirements.
Safely Handle and Assemble Door Sections
Before lifting any panels, verify each door section’s weight, balance point, and hinge orientation so you can control the load and prevent pinch hazards. Use two-person lifts or a mechanical aid for door section handling. Wear cut‑resistant gloves; keep fingers clear of joints. Place sections flat on padded sawhorses. Confirm factory labels match your layout. Pre-stage fasteners, hinges, and weatherstrips in order.
- Apply manufacturer torque specs to hinge screws.
- Use a square and straightedge to confirm edges align.
- Tape temporary alignment marks; remove after verification.
- Never stand beneath a freestanding stack.
| Step | Checkpoint | Pass/Fail |
|---|---|---|
| Lift | Balance point controlled | ___ |
| Align | Edges flush, gaps uniform | ___ |
| Secure | Correct fastener, torque | ___ |
| Inspect | No cracks, dents, burrs | ___ |
Document assembly techniques and nonconformances before proceeding.
Door weight and handling difficulty often depend on garage door installation materials, which directly impact safety during installation.
Install and Align Tracks, Hinges, and Rollers
With door sections assembled and staged, set the vertical and horizontal tracks, hinges, and rollers so the door moves true without binding. Confirm plumb, level, and clearance. Maintain manufacturer-specified gaps between track and door edge, and verify fastener torque. Keep fingers clear of pinch points during hinge installation and roller seating.
- Verify track alignment: plumb within 1/8 in., level across the header, and parallel rails. Shim as needed; tighten lags into framing, not drywall.
- Perform hinge installation: use correct hinge numbers per section; center hinges on stile, pre-drill, and drive corrosion-resistant screws to spec.
- Install rollers: seat stems fully in hinges and track; confirm free rotation and no rubbing.
- Test travel manually: lift each section slowly, checking for smooth movement, equal gaps, and secure hardware.
Torsion and Extension Spring Safety and Tensioning
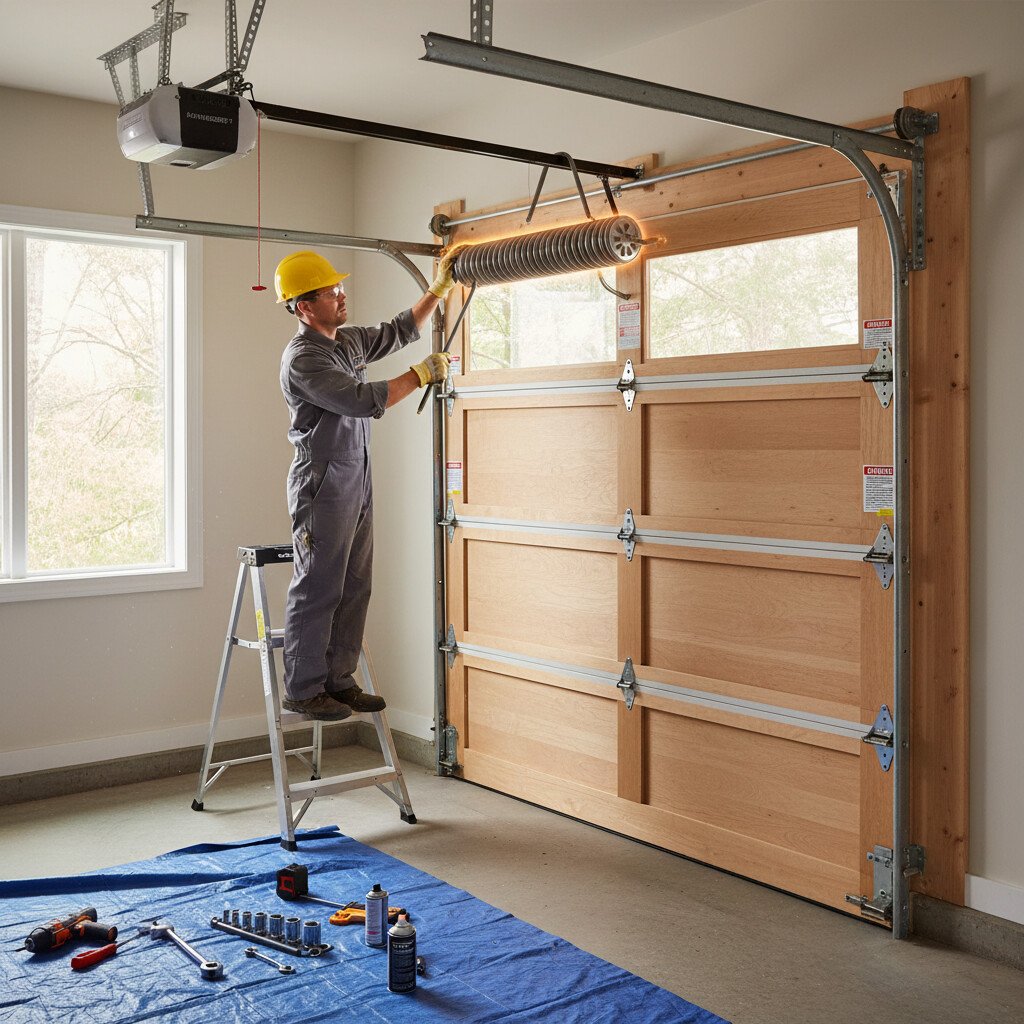
Identify whether you have torsion springs on a shaft above the door or extension springs along the tracks, as the safety steps differ.
Use only manufacturer-specified tools and torque values, lockout the opener, clamp the door, and follow the safe tensioning procedure for your spring type.
If specs or tools aren’t available, stop and contact a qualified technician.
Identify Spring Type
Although both systems counterbalance the door, you must first confirm whether your garage uses torsion springs (mounted on a shaft above the door) or extension springs (mounted along the horizontal tracks).
Accurate spring identification determines hardware selection, bracket placement, and compliant labeling. Check the door closed, power off, and lock-out engaged before you inspect spring types.
- Look location: torsion springs sit above the header with center and end bearing plates; extension springs run parallel to tracks with safety cables threaded through.
- Note hardware: torsion uses drums and a solid shaft; extension uses pulleys, eye bolts, and stretch-limiting safety cables.
- Read markings: manufacturer tags list wire size, length, wind, and cycle rating; record them.
- Measure safely: verify inside diameter, coil wire size, and spring length without loosening set screws or altering hardware.
Many installation injuries happen due to improper handling of garage door installation components, especially springs and tension hardware.
Safe Tensioning Procedure
Before applying or removing spring tension, de-energize the opener, lock out/tag out the circuit, clamp the door to the tracks, and block the door open if required by the manufacturer.
Wear eye protection and gloves. Use manufacturer-specified winding bars—never improvised tools.
For torsion springs: verify center bearing and cable drums are seated. Mark the shaft and cone.
Perform tension adjustment in quarter-turn increments, alternating bars, maintaining full bar engagement. Tighten set screws to the specified torque. Confirm cables are seated, then conduct spring calibration: lift test to mid-travel; the door should hold position.
For extension springs: confirm safety cables are installed. Adjust tension evenly via S-hooks or turnbuckles.
Replace frayed components. Reconnect the opener, perform force and travel limits per UL 325, and retest balance and reversal.
Mount and Test the Garage Door Opener Safely
Once the door is balanced and tracks are secured, mount the opener per the manufacturer’s instructions and applicable codes (UL 325, local electrical).
For safe opener installation, fasten the header bracket to solid framing, align the rail with the door’s centerline, and support the motor unit with vibration-resistant hangers.
Use a dedicated grounded receptacle; never use an extension cord. Route the low-voltage wires cleanly, stapling without piercing insulation.
- Set travel and force limits precisely; the door must reverse on a 2×4 laid flat under the door.
- Mount photoelectric sensors 4–6 inches above the floor; verify they’re aligned and powered.
- Test manual release; the door should move freely and stay where positioned.
- Perform opener testing: run multiple open/close cycles, checking smooth starts, stops, and a quick reverse on obstruction.
Final Safety Checks, Balance Testing, and When to Call a Pro
Even after opener tests pass, complete a final safety audit to ensure the system meets code and manufacturer specs.
Inspect fasteners on tracks, brackets, and hinges; confirm cable terminations, drum set screws, and bearing plates are secure. Test photo-eyes for alignment and reversal, set force and travel limits per the manual, and check the emergency release.
Perform a balance test with the opener disconnected. Lift the door 3–4 feet; it should hold position. If it slams or rises, the spring torque is incorrect—do not adjust torsion or extension springs yourself.
Cycle the door three times, checking for rubbing and smooth travel. Stop and seek professional help if you find frayed cables, cracked panels, or misaligned tracks.
Conclusion
You’ve just engineered a fortress-grade garage door—because safety isn’t optional, it’s mission-critical. Keep your PPE on, your workspace spotless, and your procedures tighter than a torque spec. Double-check tracks, test balance like a hawk, and never rush spring tensioning—ever. If anything feels off by a millimetre, stop and reassess or call a pro. Do this right, and your door won’t just open; it’ll perform like a perfectly tuned machine, day after day, without a single unsafe shortcut.