Choosing the right garage door opener starts with matching drive type, horsepower, and safety features to your door’s weight, balance, and track system. You’ll want quiet, low‑vibration operation, UL 325–compliant photo-eyes, and battery backup for outages. Check smart controls for secure encryption and vehicle compatibility (HomeLink/CarPlay). Verify headroom, rail length, and reinforced struts before installation. DIY is possible, but torque calibration and force limits must be set precisely—next, compare chain, belt, screw, and direct drive options.
Key Takeaways
- Choose the right drive type: belt for quiet, chain for durability, screw/direct for low maintenance and precision.
- Match horsepower to door weight and balance; add a 10–15% safety margin to protect the motor.
- Prioritize safety features: photo-eyes, force reversal, rolling-code encryption, and UL 325 compliance.
- Add smart features: app control, geofencing with warnings, event logs, and regular firmware updates.
- Ensure outage readiness: integrated battery backup, quarterly testing, and proper charger protections.
Understanding How Garage Door Openers Work
Garage door openers convert electrical power into controlled motion via a motor, drive system (chain, belt, screw, or direct), and logic board that interprets remotes, wall controls, and safety sensors.
The logic board regulates motor torque and speed to move the trolley; balanced springs handle the load. Limit and force settings control travel and obstruction response, while photo-eyes provide UL 325 entrapment protection. Rolling-code encryption prevents signal replay.
Diagnostics and soft-start/stop reduce shock, extend hardware life, and ensure safe, code-compliant operation.
Chain vs. Belt vs. Screw vs. Direct Drive
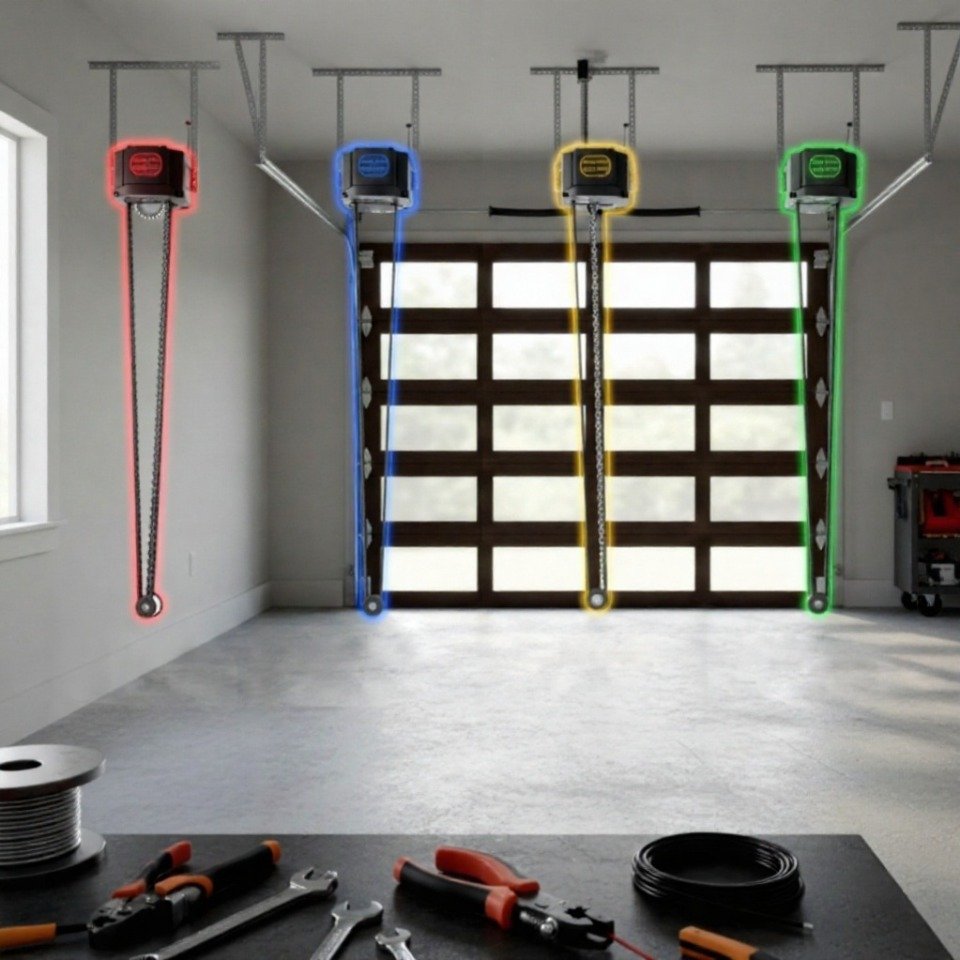
Drive choice affects noise, maintenance, speed, durability, and cost under UL 325 safety standards.
Direct Drive: motor on the rail reduces wear and noise, with easier diagnostics and compliance with force/reversal and photo-eye safety.
Chain: durable and reliable, but noisy and requires lubrication.
Belt: quiet, low vibration, corrosion-resistant, minimal maintenance if properly tensioned.
Screw: precise linear motion with fewer parts; needs seasonal lubrication.
Choosing the Right Horsepower for Your Door
How much motor power do you really need to lift your specific door safely and within spec? Start by measuring door weight and confirming spring balance: a properly tensioned door should stay mid‑travel. Match horsepower ratings to load with a 10–15% safety margin, and verify the opener’s maximum door weight per the manufacturer. Oversizing modestly improves duty cycle; undersizing risks overheating, clutch slippage, and noncompliance with UL 325.
| Door Type/Weight | Recommended HP |
|---|---|
| Single 8–9 ft, ≤150 lb | 1/2 HP |
| Double 16 ft, 150–300 lb | 3/4 HP |
| Insulated/wood, 300–500 lb | 1–1¼ HP |
Confirm headroom, track condition, and spring calibration before final selection. Use a dedicated 120V circuit, correct amperage, and thermal protection. After installation, test force/reverse limits and photo-eyes per manufacturer and local code.
To size an opener correctly, start with accurate garage door installation measurements, since door size and build often predict weight and load.
Noise Levels and Vibration Considerations
You should evaluate how drive type affects acoustic output and transmitted vibration—belt drives are typically quieter and smoother than chain or direct-drive units.
Consider your home’s layout: if bedrooms sit above or adjacent to the garage, prioritize low dB ratings, vibration isolation mounts, and soft-start/soft-stop controls per manufacturer specifications.
Verify compliance with relevant standards and install per torque, anchoring, and balance guidelines to prevent structure-borne noise and safety hazards.
Drive Type Impact
Drive type affects noise, vibration, wear, and safety, not load capacity. Evaluate sound, vibration, maintenance, and UL 325/ANSI compliance. Choose for durability and quiet operation to protect tracks and framing.
- Chain: high torque, moderate cost; louder, more vibration; use isolators and maintain tension.
- Belt: quiet, low vibration; rubber or polyurethane belts dampen harmonics; reinforced belts recommended.
- Direct Drive: minimal parts, precise, low vibration, low maintenance.
- Screw: fast, consistent; moderate noise; seasonal lubrication needed.
Benefits: reliability, reduced structure-borne noise, safer operation.
Home Layout Considerations
For garages adjoining living spaces, minimize noise and vibration with DC motors, soft-start/stop, and belt or direct-drive systems.
Use vibration-damping brackets, neoprene pads, and properly tensioned rails. Install nylon rollers, balanced springs, and aligned tracks to prevent rattle.
Mount header brackets to structural members, torque fasteners to spec, and lubricate panels per ANSI/CDA. For quiet access, consider wall-mounted jackshaft units and verify sound levels after installation.
Smart Features and App Connectivity
You can use remote monitoring and control to check door status, receive alerts, and execute secure open/close commands via a standards-compliant app.
Configure geofencing auto close to trigger only within a defined radius and with authenticated devices to prevent unintended operation.
Always enable MFA, use encrypted connections, and test fail-safes (photo-eyes, force limits) after any smart feature changes.
Remote Monitoring and Control
Remote monitoring lets you check door status, receive alerts, and operate the opener securely via an app.
Use encrypted sessions, MFA, and role-based permissions. Configure alerts for forced entry, prolonged open states, and failed logins. Integrate with cloud services supporting TLS 1.2+ and signed firmware.
- Check live status, event history, and obstruction reversals.
- Send authenticated open/close commands with audit logs.
- Set alert thresholds, notifications, and escalation paths.
- Manage users, keys, and temporary codes with least privilege.
Keep firmware updated, review logs, and rotate credentials regularly.
Geofencing Auto Close
Use geofencing to auto-close only when authorised devices leave a defined perimeter, and the door is clear. Verify with position, tilt, photo-eyes, and force limits.
Provide audible/visual warnings and tap-to-cancel prompts per UL 325 and local codes. Calibrate radius and dwell time to avoid false triggers. Use encrypted location data, local fail-safes, and suspend actions if connectivity drops.
Log events with time, device, and outcome. Set guest exceptions and delivery windows. Test monthly and update firmware regularly.
Safety and Security Technologies to Look For
Some features do more than add convenience—they protect people, property, and networks. You should confirm the opener meets UL 325 and ANSI/DASMA standards and supports hardened encryption.
Prioritize redundant safety sensors that stop and reverse on obstruction, calibrated per manufacturer specs for reliable child safety and pet protection. Use rolling security codes to deter replay attacks and keep remote access tamper-resistant. Ensure the emergency release is accessible yet shielded to reduce theft prevention risks.
- Safety sensors: align, test weekly, and verify fail-safe behavior.
- Encrypted security codes: rolling or hopping algorithms with lockout on brute-force attempts.
- Shielded emergency release: use a shrouded handle and inside-only pull to reduce fishing.
- Monitoring alerts: get door state, fault logs, and unauthorized access notifications in real time.
Battery Backup and Power Outage Readiness
A battery-backed opener ensures safe egress and secure closure during power outages. Choose a UL 325–listed unit with sealed lead-acid or lithium batteries sized for multiple cycles. Ensure temperature-compensated charging and overcurrent protection.
Test quarterly: simulate outages and verify travel limits, photo-eyes, and force settings. Replace batteries per lifespan or if capacity drops.
Mount above flood level, label disconnects, and document procedures. Conserve cycles and check the balance during extended outages.
Compatibility With Doors, Tracks, and Cars
Verify opener compatibility with door type, track, and in-car systems. Match weight, balance, and spring type to avoid excess load and safety issues.
Ensure opener suits sectional, tilt-up, or high-lift tracks and maintains proper travel and force limits. Confirm car integration with HomeLink or Car2U protocols.
Check door size, material, and weight; measure track radius, clearance, header height, and backroom per specs.
Choose an opener with adequate lift, soft-start/stop, UL 325 safety sensors, rolling-code security, and updated firmware for vehicle integration.
Opener selection depends on door design, and different types of garage doors can change the rail setup, lift requirements, and compatibility.
Professional Installation vs. DIY Setup
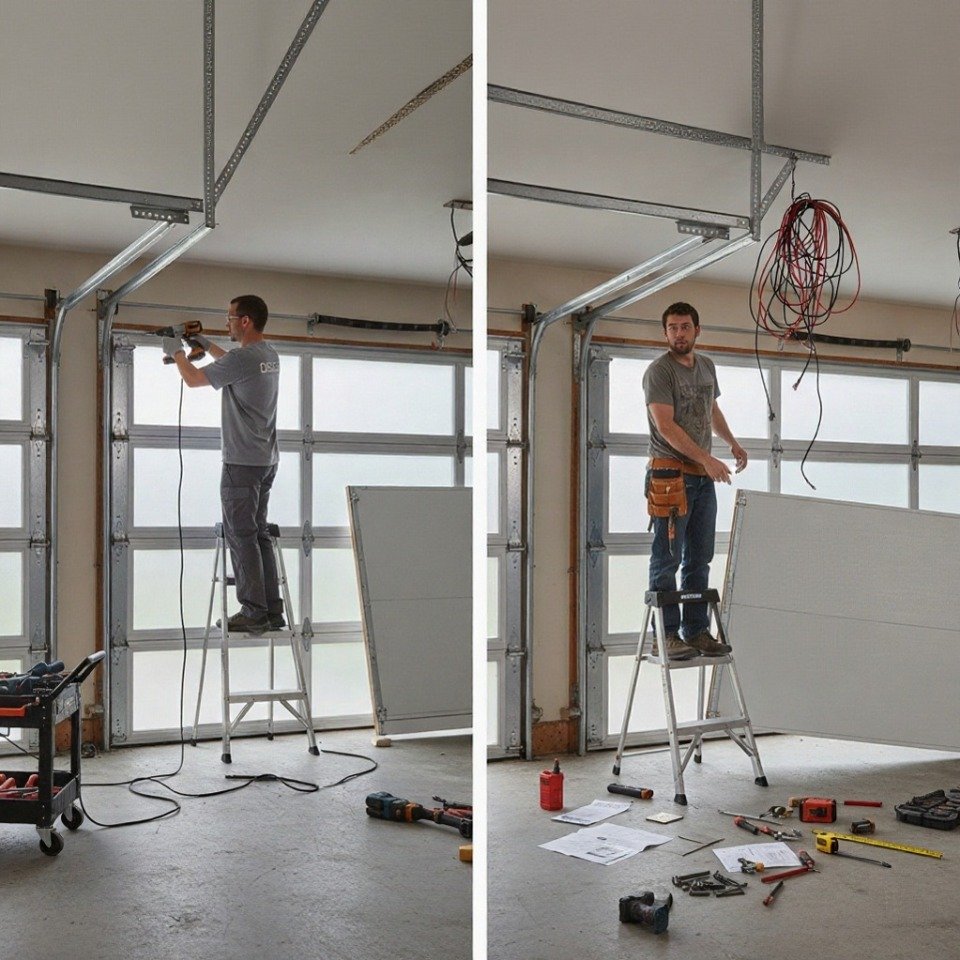
Decide between a pro and DIY by weighing cost, time, and risk. Pros follow UL 325 and local codes, set force limits, align photo-eyes, validate reversal, and ensure rail, spring, and circuit compatibility—plus warranty coverage.
DIY saves labour and offers hands-on experience but requires torque control, ladder safety, and electrical grounding. Misalignment or poor anchoring can compromise safety and void coverage. Pros also plan future upgrades like battery backup, smart controls, or DC motors.
If you’re weighing setup risk and warranty coverage, this DIY or hire a pro guide can help you choose the right approach.
Maintenance Tips and Longevity Planning
Although openers are low-maintenance, you should follow a scheduled checklist to extend service life and keep the system code-compliant.
Build a preventive maintenance plan that aligns with manufacturer manuals, UL 325, and local codes. Document dates, findings, and parts replaced to forecast wear and budget for upgrades.
- Test safety systems monthly: verify photo-eyes align at 6 inches, clean lenses, confirm auto-reverse with a 2×4 test, and check force settings.
- Implement a lubrication schedule: apply garage-rated lubricant to rollers, hinges, and bearings; never grease nylon wheels; wipe excess to avoid debris buildup.
- Inspect hardware torque: tighten track fasteners, bracket anchors, and opener mounting bolts; check belt/chain tension and rail alignment.
- Evaluate power and backup: test GFCI circuits, battery backup runtime, surge protection, and firmware updates.
Replace worn seals and balance springs professionally.
Opener strain and door balance affect long-term wear, so understanding garage door lifespan after installation helps you protect both the motor and hardware.
Conclusion
You’ve got the specs, standards, and safety checks—now choose the opener that fits like a calibrated glove. Match horsepower to door weight, pick the quietest drive for your space, verify photo-eyes and auto-reverse, and enable secure smart access with MFA. Ensure UL 325 compliance, battery backup, and vehicle compatibility. If wiring or torsion springs raise flags, call a pro. With proper installation and maintenance, your garage door will run like a metronome—steady, safe, and ready every day.