If your garage door opens partway and stops, start with safety and simple diagnostics. Check for flashing photo‑eye indicators, dirty lenses, or misalignment. Inspect tracks for debris, dents, or binding rollers. Manually lift the door to test its balance—heavy or uneven movement indicates spring or cable issues. Verify travel limits and force settings on the opener. Consider weather‑related swelling, poor lubrication, or low voltage. Next, you’ll pinpoint which fix you can do—and what a pro should handle.
Key Takeaways
- Misaligned or dirty photo eye sensors cause the opener to stop mid-travel; clean lenses and confirm solid indicator LEDs.
- Door imbalance or weak springs add load; if it won’t hold halfway manually, call a professional for spring repair.
- Track obstructions, dents, or misaligned sections make rollers bind; clear debris, straighten tracks, and tighten hardware.
- Incorrect travel limits or excessive force settings halt movement; recalibrate open/close limits and adjust force per the manual.
- Weather and power issues affect operation; lubricate moving parts, check outlet voltage, and replace weak backup batteries.
Quick Safety Checks Before You Touch the Opener
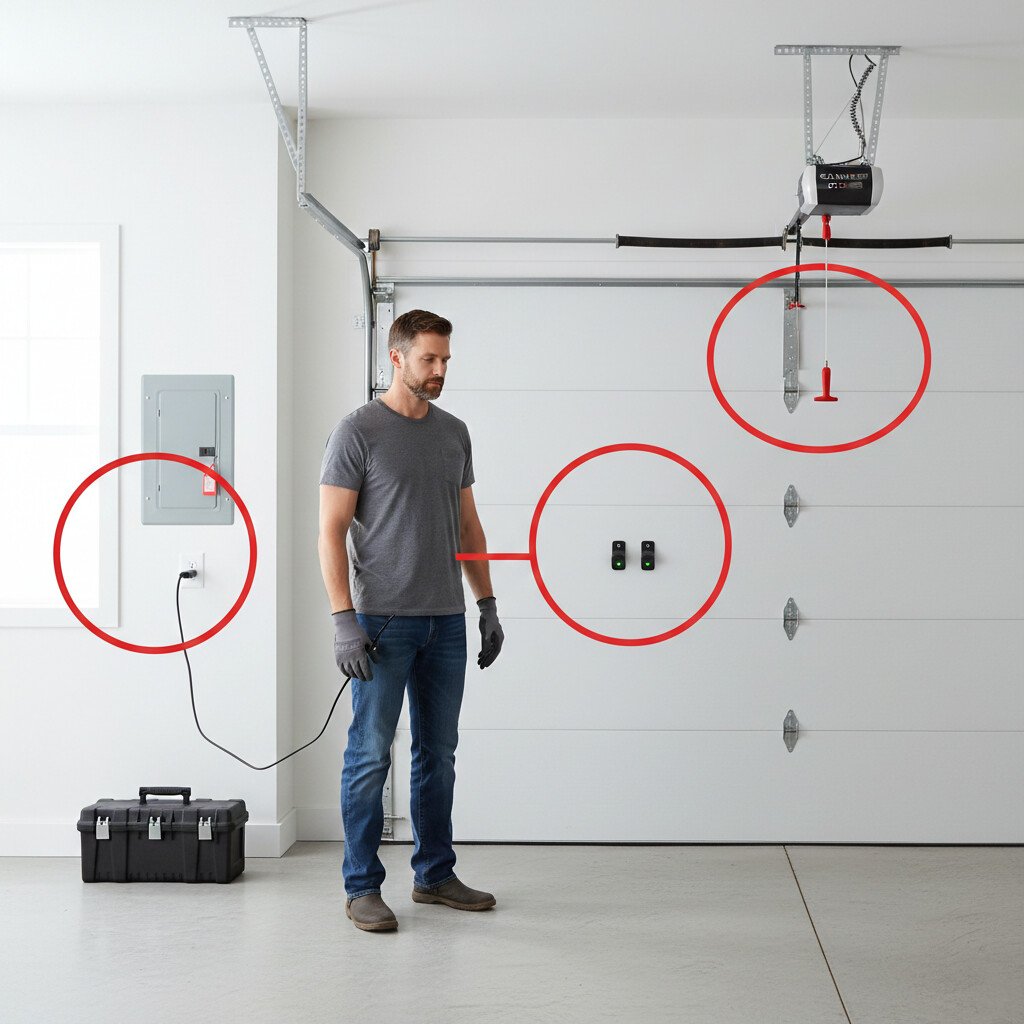
Before troubleshooting, confirm three safety conditions: disconnect the opener’s power, secure the door, and verify a clear work area.
Before troubleshooting: disconnect opener power, secure the door, and ensure the work area is clear.
Place the garage door in the down position; clamp locking pliers on both tracks above the rollers to prevent movement.
Inspect torsion or extension springs for gaps, distortion, or frayed cables; if damaged, stop—these components are high-tension.
Check track fasteners, hinges, and bearing plates for looseness; tighten only accessible hardware.
Validate lift cables are seated on drums.
Ensure photo-eyes are clean, aligned, and undamaged without touching wiring.
Wear eye protection and gloves.
Follow manufacturer safety precautions and labeling.
Restore power only after completing checks.
If the door stops mid-travel, the safest move is to check for serious red flags before forcing the opener to keep pulling. Use this guide on urgent signs of garage door failure you shouldn’t ignore to spot issues like binding tracks, cable problems, or imbalance that require repair—not more troubleshooting.
Fast Fixes When Your Garage Door Won’t Open Fully
Start with the sensors: confirm both photo eyes are aligned, clean, and show solid indicator LEDs.
Inspect the vertical and horizontal tracks for debris, dents, or loose fasteners that create binding points.
Then test spring tension by disconnecting the opener; lift the door halfway—if it won’t hold position, the springs need adjustment or replacement by a technician.
When your door opens partially and suddenly stops, scheduling an emergency garage door repair can restore safe and reliable operation quickly.
Check Photo Eye Alignment
Although many issues can mimic a mechanical fault, misaligned photo eyes are a common cause when a garage door stops short or reverses. Verify each photo eye sits at equal height, faces directly at its mate, and shows a solid indicator light. Measure centerline from floor; adjust brackets until parallel. Clean lenses with microfiber; don’t scratch. Tighten loose mounts and wire nuts. Confirm LED status after alignment; steady means good signal. Perform sensor maintenance monthly.
| Check | Method | Result |
|---|---|---|
| Height | Tape measure | Equal centers |
| Aim | Card test through beam | No flicker |
| Signal | LED status | Solid light |
Inspect Track Obstructions
Debris in the tracks can stop a door short or trigger a safety reversal. Inspect both vertical and horizontal tracks with a flashlight. Look for pebbles, screws, bent flange edges, and hardened grease ridges.
Run your fingers along the inner rail to detect burrs or dents that snag rollers. Perform obstruction removal using a vacuum, nylon brush, and a plastic scraper; avoid solvents that attract dust.
Verify rollers spin freely and don’t bind at joints. Check bracket fasteners for protrusions. Confirm track plumb and parallel with a level and tape.
Finish track maintenance by wiping rails clean and applying a light silicone dry lube.
Test Spring Tension
If the door stalls a foot shy of fully open, verify the counterbalance spring tension before adjusting the opener. Disconnect the opener and perform spring testing manually: lift the door to mid-travel (about waist height) and release.
A correctly balanced door holds position with minimal drift. If it rises, tension is excessive; if it drops, it’s weak. Test at quarter, half, and three-quarter open. Listen for coil slip and note asymmetry between sides (for extension springs).
Perform tension adjustments only with proper winding bars and locked track. After adjustment, recheck balance and force.
Replace fatigued, gapped, or mismatched springs immediately.
Photo‑Eye Sensor Problems and Simple Alignment Fixes
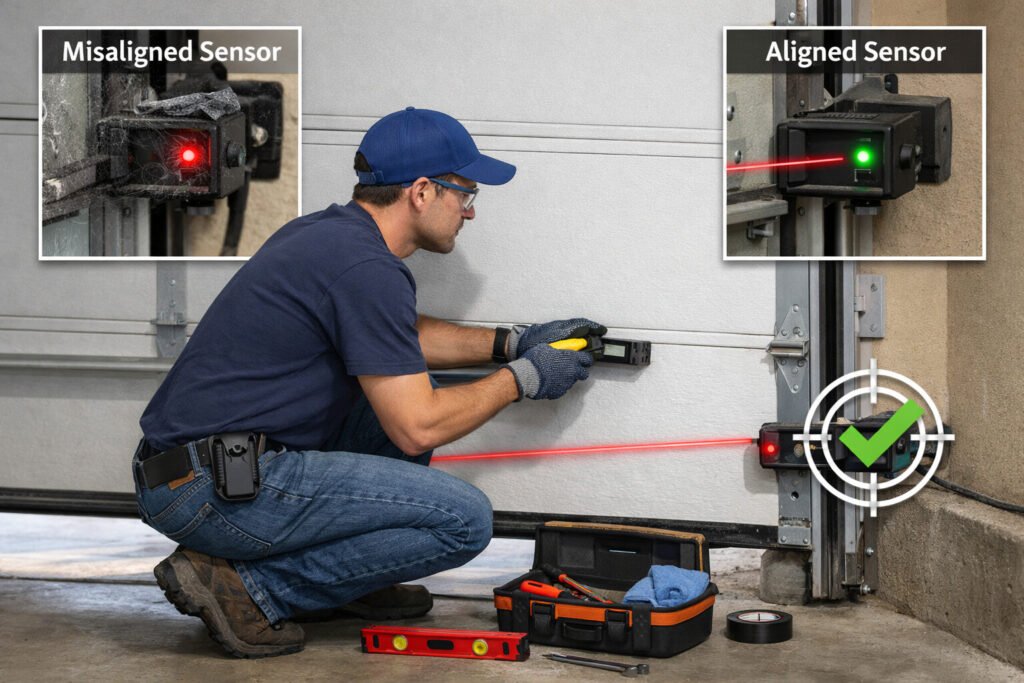
When the garage door reverses before closing or won’t move with the opener engaged, suspect a photo‑eye sensor fault and verify alignment first.
Inspect both lenses at the base of the tracks; LEDs should be solid, not blinking. Perform sensor cleaning with a microfiber cloth; remove spider webs and dust. Confirm both brackets are tight and level.
Inspect both photo-eye lenses; LEDs must be solid. Gently clean lenses and tighten, level the brackets.
- Measure photo eye alignment: set each lens center 6 inches above floor, use a torpedo level across both housings, adjust until LEDs stay steady.
- Check wiring: ensure intact insulation and firm terminal screws.
- Test function: close door; if reversal stops, alignment corrected.
Clear the Track: Obstructions, Dents, and Dirty Rollers
Start by inspecting the full track run and clearing any debris, fasteners, or foreign objects that interrupt wheel travel.
If the door binds or rubs, check for bent or misaligned track sections and correct them with measured adjustments and secure fasteners to spec.
Finish by cleaning the rollers, then apply a garage‑door‑rated lubricant to the bearings and stems to reduce friction and noise.
A door that stops mid-travel can be a sign the track is dented, warped, or pulling away from the wall, creating resistance the opener can’t overcome. Here’s a clear breakdown for how to tell if a garage door track needs repair or complete replacement before you start adjusting opener force settings.
Spot And Remove Obstructions
Though the opener often gets blamed, track obstructions and minor damage are the usual culprits. Start with a bright flashlight and slow, methodical clearance checks. Identify obstruction types: pebbles, screws, hardened grease, leaf litter, frayed cable strands, and swollen weatherstrip. Power off the opener; disconnect the door.
1) Inspect both vertical and horizontal tracks. Run your finger along the inner lips; note snags, packed debris, or shallow dings. Vacuum, then wipe with solvent.
2) Spin each roller by hand. Gritty or stuck rollers indicate contamination; clean and relubricate.
3) Verify hardware clearance: hinge bolts, track brackets, and sensor housings. Retorque loose fasteners; remove protrusions.
Fix Bent Or Misaligned Tracks
Minor bends and misalignment amplify friction, derail rollers, and overload the opener, so verify track geometry before deeper diagnostics.
Disconnect the opener, lower the door manually, and inspect both vertical and horizontal tracks for kinks, gaps at brackets, and rub marks.
Use a straightedge to check parallelism and plumb. Apply alignment techniques: loosen mounting bolts slightly, tap tracks with a rubber mallet to center over the rollers, then retighten to manufacturer torque.
Correct minor dents with a block and mallet; replace severely creased sections. Confirm equal track spacing across the door width.
Finalize with these track maintenance tips: recheck fasteners and test manual travel.
Clean And Lubricate Rollers
Cut friction at the source by clearing and servicing the rollers. Inspect nylon or steel rollers for flat spots, wobble, seized bearings, and cracked housings.
Dirty rollers increase drag, triggering safety reversal and partial travel. Perform roller maintenance with solvent cleaning, then apply targeted lubrication techniques to bearings and shafts—never the tread or track.
1) Isolate the issue: pull the emergency release, move the door by hand, feel for rough spots at specific panel heights; note locations.
2) Clean: brush debris, wipe with mineral spirits, dry thoroughly; vacuum track, avoid bending.
3) Lubricate: use garage-rated lithium or silicone spray, one short burst per bearing; cycle door to distribute.
Check Door Balance, Springs, and Cables (When to Stop)
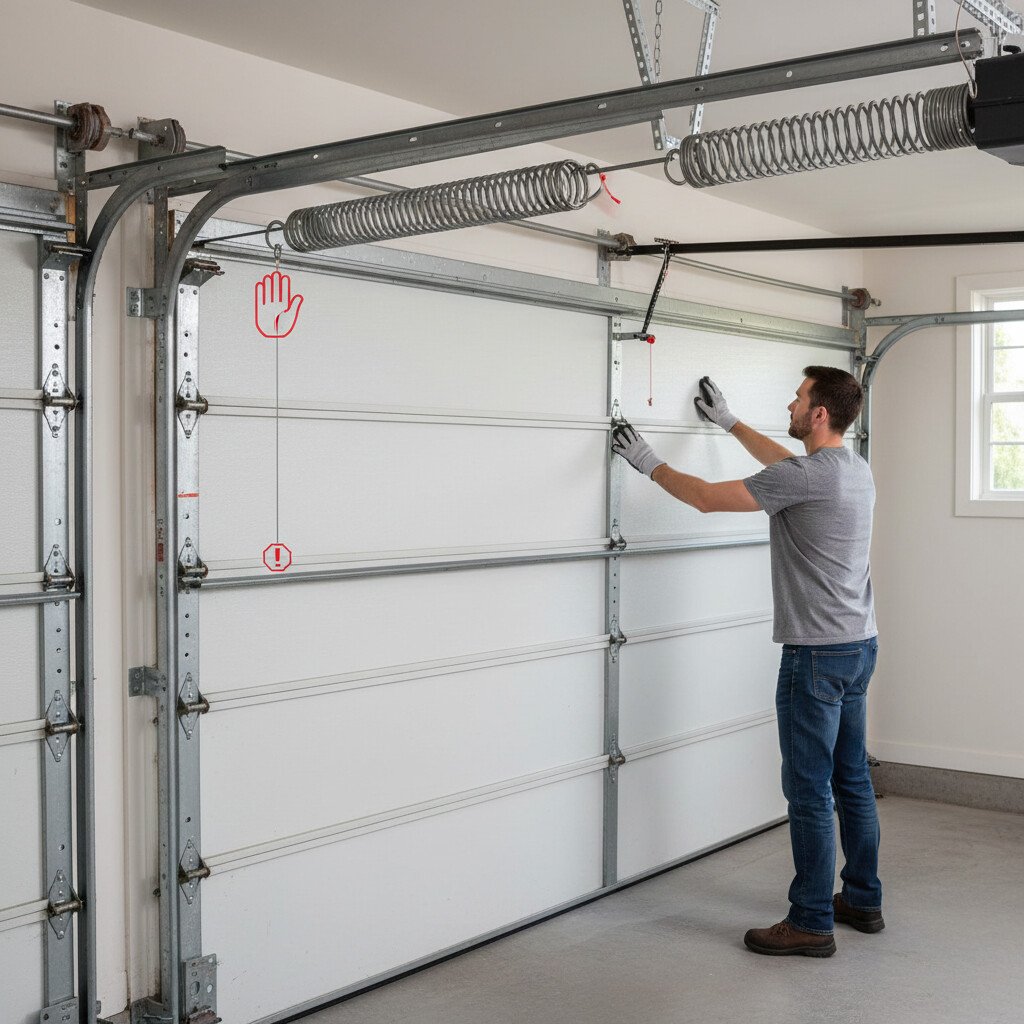
Before you troubleshoot opener settings, verify the door’s mechanical integrity—start with balance, then inspect springs and lift cables, and know when to stop. Disconnect the opener. Test door balance by lifting halfway; a balanced door stays put. If it drops or shoots up, tension is off. Perform a visual spring inspection: look for gaps, rust, frayed ends. Check cable drum seating and strand fray at the bottom bracket. Don’t touch set screws or tension hardware.
If one side of the door rises higher than the other, a slipping cable may be disrupting the balance system. Reviewing a safe troubleshooting approach for garage door cable tension problems can help you determine whether adjustment or full replacement is needed.
If your garage door opens halfway and then stops, a weakened or broken spring may be disrupting proper balance. Continuing to operate the system can strain the opener motor and cables. In these cases, knowing when expert garage door spring repair is required can save you from more expensive structural repairs.
| Check | Pass Indicator | Stop If |
|---|---|---|
| Door balance | Holds mid-travel | Slams/darts |
| Spring inspection | No gaps | Broken coil |
| Cables | Smooth, taut | Frayed/kinked |
Call a pro if any fail.
Adjust Travel Limits and Force on the Opener
Dial in the opener’s travel and force so the door stops exactly at the floor and fully open without straining the motor. You’ll correct partial opens by setting travel limit adjustments first, then refining force settings. Use the manual’s controls or dials; count turns or button taps so changes stay traceable.
Dial in travel and force: set limits first, then fine-tune force for smooth, reliable operation.
- Set close limit: run the door down; adjust until the seal compresses slightly without reversing or grinding.
- Set open limit: run up; stop just before the trolley hits the stop bolt, preventing cable slack.
- Calibrate force: raise/lower; reduce until a 2×4 obstruction triggers reversal, then add a minimal safety margin.
Weather, Lubrication, and Power Issues That Cause Mid‑Stops
When temperatures swing or humidity spikes, marginal friction and weak power delivery show up as mid‑stops.
Weather impact increases door weight: swollen wood panels, sticky vinyl seals, and stiffer grease raise running load. Cold thickens rail grease; warm dust forms abrasive paste.
Verify balance: pull the release and lift—if it won’t hold mid‑travel, spring force is low.
Address lubrication importance: clean tracks, then apply light silicone to rollers, hinges, and springs; avoid greasing tracks.
Inspect opener rail for caked grease.
Check power: test outlet voltage under load, inspect extension cords, surge protectors, and frayed wires.
Replace weak backup batteries.
If temperature shifts or moisture are involved, the fix may be more than adjusting limits—cold can freeze seals, humidity can affect sensors, and debris can bind tracks. Use this step-by-step weather repair playbook for garage doors to diagnose the exact weather-triggered cause before you keep forcing the opener.
When to Call a Pro and Typical Repair Costs
How do you know it’s time to stop troubleshooting and call a technician?
Call when you see torsion spring gaps, frayed lift cables, bent tracks, burned opener board, or repeated force/limit faults after correct resets.
If the door’s heavy when disconnected, the counterbalance is unsafe. Electrical smells, smoke, or blown fuses also signal when to call.
- Spring or cable replacement: typical repair $150–$350 (single), $200–$500 (double); urgent calls cost more.
- Track, roller, or hinge correction: typical repair $100–$300; severe bends require replacement.
- Opener diagnostics/board, sensors, capacitor: typical repair $90–$350; full opener replacement $350–$800 installed.
Partially opens then stops” can come from several different causes, and the price changes depending on whether it’s sensors, track binding, spring imbalance, or an opener setting issue. This reference on typical repair costs for each cause of mid-stop problems helps you match symptoms to realistic pricing.
Conclusion
You’ve now got a diagnostic roadmap to stop mid‑cycle stalls. Start with sensor alignment and track obstructions, then verify balance and opener limits before touching springs. Keep this: misaligned photo eyes account for roughly 40% of “partial open” calls. Clean, align, and test reversal. Inspect rollers, hinges, and cables; lubricate moving parts; recalibrate travel and force. If the door’s unbalanced or springs/cables look suspect, stop and call a pro—those fixes are high‑tension, high‑risk, and worth the cost.