Picture your garage door as a moving wall that must fit, seal, and secure with precision. You’ll start by defining how you use the space, then verify rough opening measurements, headroom, and side clearances. Next, align style with architecture, pick materials for climate and upkeep, and size insulation to your region. Add photo-eyes, pinch resistance, and smart controls. Plan circuits and opener load. Set a realistic budget and install path—but there’s one choice many homeowners overlook.
Key Takeaways
- Define your needs and climate: storage use, noise tolerance, security level, and weather exposure to guide materials, insulation, and features.
- Measure the opening precisely: width, height, diagonals, headroom, side room, and backroom; note obstructions and confirm squareness.
- Match style to your home: panel profiles, materials, and colors that align with architectural lines and maintenance tolerance.
- Plan safety, security, and smart features: auto-reverse, reinforced locks, encrypted opener, battery backup, lighting, and Wi-Fi coverage.
- Verify installation and upkeep: electrical requirements, wind-load codes, warranty, haul-away fees, and a maintenance schedule for springs and hardware.
If you want a quick comparison of styles and features before choosing, explore garage door options for your home to narrow down the best fit.
Assess Your Needs and Lifestyle
Define garage functions: vehicle storage, workshop, gym, mudroom, or pantry. Log entry/exit frequency, dwell time, and noise tolerance.
Consider climate, sun exposure, proximity to conditioned spaces, and security needs. Align materials and features with lifestyle: low-maintenance, quiet operation, impact resistance, or corrosion resistance.
Set requirements: insulation R-value, wind-load rating, panel gauge, opener duty cycle, acoustic rating, and clearance for racks or lifts. Include safety features—photo-eyes, auto-reverse, pinch-resistant hinges.
Plan connectivity: battery backup, smart controls, geofencing. Set a budget and prioritise performance over aesthetics as needed.
Measure Your Garage Opening Accurately
Accuracy starts with a calibrated tape, a level, and a notepad. Verify your measurement tools are accurate; check the tape against a known standard.
Measure the opening width in three locations—bottom, mid-height, and header—and record the smallest. Measure the height on both sides and the center; use the shortest value. Confirm the opening is square by comparing diagonal lengths; a variance over 1/4 inch signals adjustments.
Check plumb on both jambs with a level. Measure the headroom from the header to the ceiling, the backroom from the opening to the rear wall, and the sideroom on both jambs.
Document obstructions: outlets, pipes, tracks, and lights. Note framing thickness and material.
Summarize garage dimensions clearly, then photograph each measurement for verification and quoting.
To avoid ordering the wrong size, follow garage door installation measurements before finalizing your door choice.
Match Door Styles to Your Home’s Architecture

Align the door’s panel layout, window lites, and trim profiles with your home’s roof pitch, mullion spacing, and facade rhythms for complementary architectural lines.
Select materials—steel, aluminum, wood, or composites—based on your siding type, climate exposure, and maintenance tolerance.
Match color using manufacturer RAL or custom finishes that coordinate with your body, trim, and accent palette for a cohesive elevation.
Complementary Architectural Lines
When you match a garage door to your home’s architecture, focus on line, proportion, and material continuity. You’re aiming for design coherence and aesthetic balance by echoing the home’s dominant geometries.
Read the façade: verticals from siding or pilasters, horizontals from belt courses, and rhythms from window spacing. Then select panel layouts, rail dimensions, and stile counts that align with those cues and scale.
- Align panel breaks with sill lines, header heights, or cornice bands to maintain visual continuity.
- Match stile spacing to window mullion rhythm to prevent discordant intervals.
- Specify rail thickness that mirrors trim reveals for consistent shadow lines.
- Choose panel profiles that echo door and window casing geometries.
- Use arched or straight tops to mirror primary opening shapes and roofline cues.
Material and Color Harmony
With panel geometry set, select materials and colours so the door integrates with the building.
Match cladding, roof, and trim: fibre-cement pairs with steel or aluminium; cedar/redwood with engineered wood and UV-resistant stain.
Consider trends: low-maintenance steel with faux grain, insulated aluminium for coastal areas, or durable composite overlays.
Use color to control presence: low-chroma matches minimise visual mass; high-contrast suits modern forms. Sample in daylight, target LRV within 5–10 points of adjacent surfaces, and ensure finish suits the climate
Compare Materials for Durability and Maintenance
Curious which garage door material stands up best over time with the least upkeep? Compare wood vs. steel, aluminum, vinyl, and fiberglass options by assessing corrosion resistance, surface hardness, coating durability, and service intervals.
You’ll balance dent resistance, rot risk, and finish longevity against your climate and use pattern.
- Steel: Galvanized with polyester or PVDF coatings; resists warping; prone to dents and edge rust if coatings are breached; wash quarterly, spot-paint chips.
- Aluminum: Impervious to rust; lighter hardware loads; can dent; anodized finishes need gentle cleaning; ideal for coastal environments.
- Wood: Highest aesthetic; requires sealing every 1–2 years; susceptible to rot, swelling, and UV degradation; heavier springs and hinges needed.
- Fiberglass: Shell over steel/wood frame; won’t rust or rot; resists salt; can fade; minimal washing and occasional UV protectant.
- Vinyl: Inert, dent-resistant skin; color-through reduces touch-ups; limited color changes; rinse dirt; inspect seals annually.
For a deeper breakdown of durability and upkeep, compare garage door installation materials before deciding.
Evaluate Insulation and Energy Efficiency
Check R-value or U-factor: higher R / lower U-factor means better thermal resistance.
Choose insulation: EPS polystyrene offers basic rigidity; polyurethane (PUR) provides higher R per inch, stiffness, and quieter operation.
Ensure continuous thermal breaks in stiles/rails and double- or triple-layer construction with interior steel backing. Inspect weatherstripping, bottom seals, and inter-panel joints to limit air leakage.
Match R-value to climate and garage use, verify tested energy ratings, and install correctly to maintain performance.
Insulation only performs well when installed correctly—energy efficiency starts with proper garage door installation.
Prioritize Safety, Security, and Smart Features
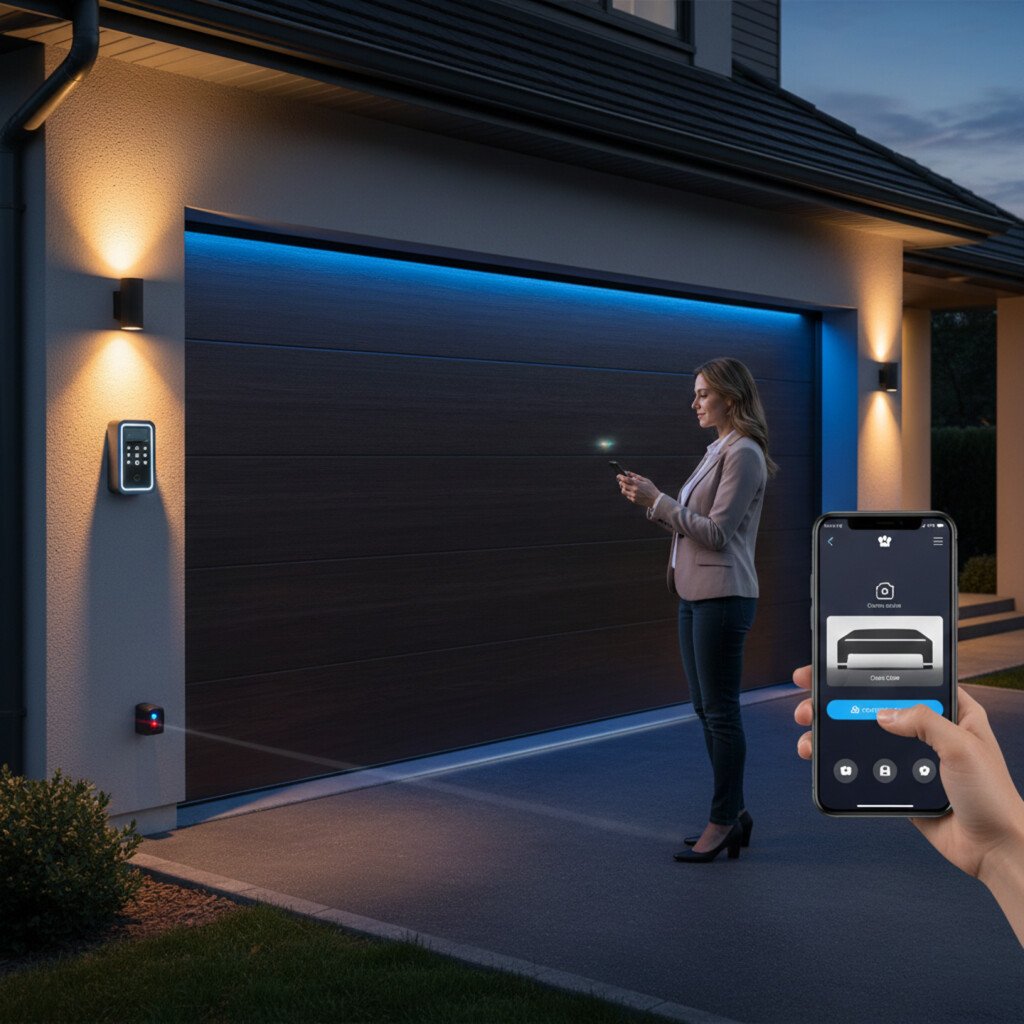
Every modern garage door should combine physical safeguards, intrusion resistance, and connected controls.
Start with safety features that prevent injuries and damage: a self-testing auto-reverse system using infrared photo eyes and force-sensing, plus a cable and spring containment design to prevent snap-back.
Add a tamper-resistant bottom bracket and pinch-resistant panel profiles. For security, choose reinforced locking hardware and openers with rolling-code or encrypted radio, and harden the door with a steel end stile.
- UL 325–compliant opener with monitored photo eyes and force limits
- Torsion spring system with containment cones and high-cycle rating
- Pinch-resistant, wind-rated sections with steel end stiles
- Smart technology: encrypted Wi‑Fi hub, user roles, geofencing, OTA updates
- Battery backup, manual release shield, and motion-activated LED lighting
Verify compatibility with your existing opener accessories and local wind-load codes.
Set a Realistic Budget and Plan Installation
Map full ownership costs: door sections/finish, insulation (R-value), hardware (springs, tracks, stiles), opener, smart hub, safety devices, and labour.
Set a budget with line-item estimates plus 10–15% contingency. Compare steel, composite, and wood; include repainting/refinishing cycles. Double doors need stronger springs, openers, and tracks.
Plan installation: new construction—rough opening, header, jambs; replacements—backroom, headroom, side clearance, low-headroom kits. Include electrical: dedicated circuit, GFCI, Wi‑Fi.
Schedule spring calibration, photo-eye alignment, wind-load checks, and haul-away.
Conclusion
You’ve now audited your lifestyle, measured like a surveyor, and matched styles so the neighbors stop calling your garage “the mouth.” You’ll compare steel gauges, R-values, and wind-load ratings like a lab tech, then wire GFCI circuits so your opener doesn’t sulk. You’ll program rolling-code remotes, test auto-reverse, and schedule lubrication like it’s a lunar launch. Congratulations: you’ve turned a hole in the wall into a climate-managed, intrusion-resistant portal—because obviously your lawnmower requires aerospace-grade security.