Planning a garage door starts with choosing materials and styles that match your climate, security needs, and budget, then confirming the opener type supports your door’s weight and duty cycle. You’ll measure rough opening and headroom precisely, prep framing, and verify permits and HOA rules. Don’t skip insulation, weather seals, or safety hardware. Line up a qualified installer and a maintenance plan. Here’s where most projects go off track—and how to avoid it.
Key Takeaways
- Select door material and style for your climate, security needs, and opener capacity; verify structural ratings and insulation (R-value).
- Measure opening width, height, headroom, and sideroom precisely; record smallest dimensions and correct slab deviations over 1/4 inch.
- Choose an opener matched to door weight and type; include safety features, battery backup, and quiet or heavy-duty drive as needed.
- Confirm permits, code requirements (wind load, fire separation), and HOA approvals before ordering; plan weather sealing and insulation.
- Schedule maintenance: lubricate hardware, test auto-reverse, replace worn parts, update opener firmware; never adjust torsion springs yourself.
Before planning your install, it helps to understand how garage door installation works so each step and requirement makes sense.
Choose the Right Door Material and Style
Select material and design based on climate, security, opener capacity, wind load, corrosion, and insulation.
Coastal: aluminium (powder-coated) or fibreglass. Cold: steel with high-R polyurethane and thermal breaks. Hot: light colours, UV-stable coatings.
Check steel gauge, wood/composite rot resistance, and aluminium/steel dent resistance. Balance aesthetics with performance: panel type, stile reinforcement, hinge/roller ratings. Use tempered or laminated glass, verify track gauge and torsion tube, and install tamper-resistant brackets and proper weatherseals.
If you’re still comparing styles and build types, explore the best garage door options for your home before finalising your plan.
Match the Opener Type to Your Door and Usage
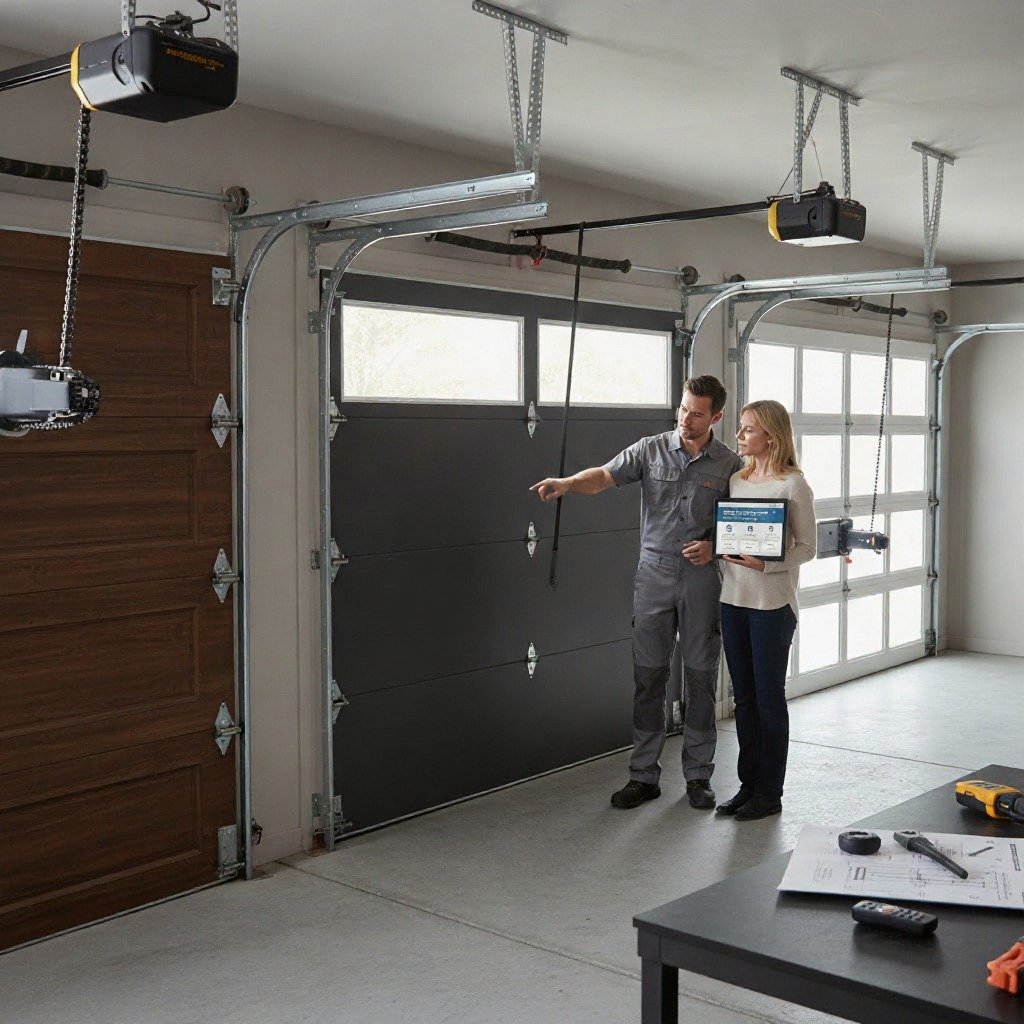
With the door’s material, weight, and reinforcement set, select an opener that can safely lift it under worst-case conditions. Verify opener compatibility with door type (sectional, tilt-up, full-view) and spring balance. Heavier doors often need DC motors with soft-start/stop and higher torque. Match drive type to usage frequency and noise limits: belt for quiet, chain for heavy-duty, screw for speed, jackshaft for high-cycle or limited headroom. Include safety features: photo-eyes, force reversal, manual release, and battery backup.
| Factor | Specification |
|---|---|
| Door weight/material | Torque rating; DC motor preferred for variable speed |
| Drive type | Belt (quiet), Chain (durable), Screw (fast), Jackshaft (side-mount) |
| Usage frequency | Residential low-cycle vs. commercial/high-cycle duty rating |
| Controls | Secure RF, rolling code, soft limits, auto-close |
| Safety | UL 325 compliance, photo-eyes, monitored reversal, battery backup |
Door weight and daily usage affect performance, so choosing the right garage door opener should be part of your planning checklist.
Measure the Opening and Clearances Accurately
Measure the door opening dimensions—width, height, and out-of-square—using a level and steel tape, and record to 1/8 inch.
Verify headroom and sideroom against the manufacturer’s minimums, accounting for track type, spring system, and opener hardware.
If any measurement is tight, plan for adjustments or select components rated for reduced clearances to prevent binding and unsafe operation.
Use the correct garage door installation measurements to avoid ordering the wrong size or creating track alignment problems later.
Door Opening Dimensions
Verify rough opening and clearances to ensure proper fit, sealing, and operation. Measure width (top, middle, bottom) and height (sides, centre); use the smallest values. Ensure jambs are plumb, header level, and floor flat, scribe or add a threshold if sloped.
Record framing thickness, check masonry returns, and document measurements with rigid tape, 6-foot level, and photos for reference and installer coordination
Headroom and Sideroom
Some installations fail before they start because headroom and sideroom weren’t verified. Measure headroom clearance from the lintel to the ceiling or lowest obstruction; you’ll need extra space for torsion springs, shaft, and opener rail. Confirm the sideroom space from each jamb to the nearest wall or conduit for track, cable drums, and vertical angle. Check for beams, pipes, sprinklers, or wiring that encroach.
| Checkpoint | Minimum Target | Action if Insufficient |
|---|---|---|
| Headroom clearance | 12–18 in (torsion), 6–8 in (extension) | Use a low-headroom kit or a jackshaft opener |
| Sideroom (each side) | 4.5–6 in typical | Switch to narrower drums/tracks |
| Backroom | Door height + 18–24 in | Short-rail or wall-mount opener |
| Opener rail slope | Straight, unobstructed | Add strut, relocate opener |
| Structure | Solid framing | Add blocking, replace compromised lumber |
Don’t compress tolerances; binding causes premature wear and unsafe operation.
Prepare the Site and Structural Framing
Before you touch a track or torsion tube, clear and level the work area, confirm the opening’s dimensions, and verify the framing’s load path. Effective site preparation prevents trip hazards and ensures accurate layout.
Before handling track or torsion tube, prep the site: clear, level, verify dimensions and load path.
Sweep debris, anchor temporary lighting, and set a flat reference line across the header. Check slab level; correct more than 1/4-inch deviation with a non-shrink grout or suitable shim. Confirm plumb, square, and diagonal measurements.
Inspect structural support: studs, king/jack studs, and a continuous header capable of bearing spring and track loads.
- Replace undersized headers; use LVL or equivalent where spans demand.
- Add blocking for track brackets and operator hangers.
- Seal and fasten a pressure-treated sill where required.
- Pre-drill fastener locations to avoid splitting and ensure full embedment.
Check Codes, Permits, and HOA Requirements
Verify legal requirements before installation. Review local zoning for door size, setbacks, driveway slopes, and street-facing aesthetics.
Check building codes for wind load, fire separation, safety glazing, and electrical clearances. Confirm permit needs for replacement vs. new openings and gather structural details, manufacturer specs, and anchorage data.
Schedule required inspections and note lead times and fees. For HOAs, submit elevations, colours, panel profiles, and window layouts. Don’t order custom components until approvals are granted.
Plan for Insulation, Weather Sealing, and Security
With approvals in hand, specify how the door will control heat flow, air, water, and forced entry.
Choose insulation types based on climate and door construction: polystyrene panels for cost and simplicity, or polyurethane foam for higher R-value, rigidity, and noise reduction. Seal every leakage path.
Install continuous weather stripping at jambs and header, a tight bottom sweep on a level threshold, and inter-panel seals. Confirm wind-load ratings, track fastener specs, and reinforced struts for your exposure category.
Integrate security: steel skins, tamper-resistant brackets, concealed hinge pins, and a rolling-code opener with locked vacation mode. Verify sightlines and lighting to deter intrusion.
- Select insulation types matched to R-value targets.
- Fit perimeter weather stripping and a compression bottom seal.
- Specify impact-rated glazing or none.
- Add keyed lockout and opener force limits.
Coordinate Professional Installation and Ongoing Maintenance

Hire a licensed installer with insurance and manufacturer authorisation to install the door, track, springs, and opener.
Set an installation timeline: site survey, material delivery, old-door removal, hardware mounting, opener setup, and safety testing. Verify fastener torque, track plumb/level, spring balance, and photo-eye alignment. Document force settings, travel limits, and emergency release.
Obtain a written maintenance schedule and warranty. Perform quarterly checks: test auto-reverse, inspect cables, rollers, hinges, and seals; lubricate springs and bearings; tighten hardware. Replace worn parts promptly, never adjust torsion springs yourself, keep opener firmware and batteries current, and log all service.
Conclusion
So you’ve measured twice, documented thrice, and checked codes you’ll never break—because garage doors famously install themselves. Still, you’ll choose the right material, align the opener, confirm clearances, brace framing, seal gaps, and verify permits—as if gravity and torsion springs care about shortcuts. Schedule pro installation, test safety reversals, label hardware, and set maintenance reminders. Ironically, the safest, quietest door is the one no one notices—until it fails. Yours won’t, because you planned like it might.